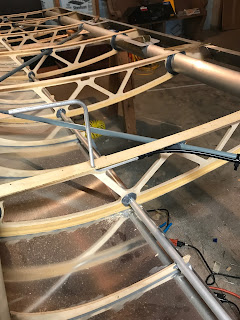
My 15 year old, Robby drilling out all of the fabric rivet holes.
My Oratex arrived, Missing an end, but all appears to be in order. We still need to body fill both wings, and rought the nav light, and recognition light wires. Then when it warms up, we'll start covering the wings.
Highlander 393
Wednesday, March 28, 2018
Tuesday, March 6, 2018
Aileron and Flap Fabric backing Plates
The fabric backing plates are complete. As you can see, I applied zinc chromate to them. Per Richard Holtz (Sheepdog), I used a non phosphorous version from PTI. I used this because Oratex requires some type of aluminum prep.
All that is left to do on the wings are to install nut plates to the #9 rib for the wing tips, and applying body filler, and of course sanding. On past projects I used Super-fill, but I consulted that factory and they are using Z-Grip by Evercoat. I looked it up on YouTube and it looks pretty cool to use. I am not going to start the fill till after I get out to the hangar. It will make too much mess in the "Wife's" Basement.
Wednesday, February 28, 2018
Pitot tube
Drilled a 1/4 in. hole at 45 degrees into the Hysol at rib #2
I'll hysol this when I do a few other hysol projects.
Wing Fabric Backing Plates
Since I can't go back to work for 60 days minimum, I'm taking the opportunity to get as much done before my returning to American Airlines. It looks like not that will be on April 8th.
Adding nut plates for future fairings
Note the joggle from the tool 2 below.
OK This Joggle Tool from Avery tool is outstanding!!! It will make for a better transition, and less body filler.
Rigging Aileron and Flap
Taped a file to the wing trailing edge for 1/8th in. spacing. Hey, what ever it takes
Clamped the hangers, and drilled the for rivet holes.
made sure the aileron moved up and down 30 degrees.
Clamped the hangers, and drilled the for rivet holes.
made sure the aileron moved up and down 30 degrees.
Lift Strut Bracket
Well Surgery is over. It went well. Margins clean!!! SO, I'm back to working on my project. But first I spent 2 weeks after the Surgery on the computer Spending Money! Aircraft Spruce is happy. I purchased, my ELT, EarthX Battery Box, All wire and connecters that I anticipate using. From Stein Air I purchased the tools I should need, and From Perihelion Design, Switch guards, Snapjacks (diode), and light weight battery cable. Thanks Ben Schneider for tipping me off to them!
I may have shown this before, but this push pull debar tool is awesome. I de-burred the entire lift strut bracket in 10 minutes. The only snag was that I bite into the I-Beam with it, and the I-Beam moved. I got it back in place and immediately Hysol and Riveted the bracket.
Wednesday, January 31, 2018
Lift Strut bracket and Aileron/Flap hanger slots
Front Strut Bracket Hysoled and riveted in place. Leading Edge Hysoled in place as well. I took a 5/8s Forstner Drill bit to cut the end of the hanger slots. Then used my multi tool with a half moon cutter to finish the slot.
Subscribe to:
Comments (Atom)
-
My 15 year old, Robby drilling out all of the fabric rivet holes. My Oratex arrived, Missing an end, but all appears to be in orde...
-
Drilled a 1/4 in. hole at 45 degrees into the Hysol at rib #2 I'll hysol this when I do a few other hysol projects.
-
The fabric backing plates are complete. As you can see, I applied zinc chromate to them. Per Richard Holtz (Sheepdog), I used a non ph...


